So this was the version of Waverley as it stood in the Masters Degree Show, from which I was awarded an Msc. in Animation & Visualisation with Distinction. Phew and big thanks to everyone who got involved/ supported me along the way.

Saturday, 1 September 2012
Waverley : Degree Show Film
So this was the version of Waverley as it stood in the Masters Degree Show, from which I was awarded an Msc. in Animation & Visualisation with Distinction. Phew and big thanks to everyone who got involved/ supported me along the way.
Waverley: Making Of
This was a video created as a basic making of which was played on one of the imacs during the degree show. Time constraints and lack of memory coupled with the knowledge that this was an extra we were not getting assessed on meant that it is not a fully polished piece but hopefully gives some insight into how Waverley was created.
MO from sarah dargie on Vimeo.
Friday, 10 August 2012
Final Blog Submission
Today is the final submission of the blog for our semester 2 assessment. I thought that it was worth explaining what would be the best way to find relevant information on the blog. I will be continuing to work on a making of to supplement the film and production bible prior to the presentation on Tuesday.
Using this blog:
Under blog archive at the right each post is listed with the date and the title for reference. I have also arranged each post under different categories or Labels which can be accessed on the right hand side so that all posts pertaining to the relevant categories can be viewed chronologically in one page even if they are interspersed throughout my blog. I have put a guide to the labels below. Please note some posts will be shown under more than one label as they were appropriate in more than one category:
1. Experiments - Practical work completed or tested for the course, storyboards, program of study,
basic match moving/ film/ HDRI tests etc.
2. General - Posts like this which are less project/ module specific or ones which are related to my
attitude or opinion of animation in the broader sense
3. Inspirations - Critical reviews of films, artworks, buildings or photographs which I feel are useful
references or examples for my main Master's project
4. Leap Year - A side project carried over from last year which I will be using as a way of testing 2D
textures on 3D models
5. Presentations - Completed final presentations or assessment work which was required throughout the
semester to pass the modules
6. Research - Similar to inspirations research is more practical and reflective and contains analysis of
certain sources and exercises such as the extract which was required for Research and
Methods module.
7. Waverley - Everything which is directly related to the practical project has been given this label.
8. Collaborative Work - Work I have done with or for other animation students.
I hope you enjoy my blog so far and thank you for the time to look through it!


H.264 FILM EXPORT TEST
Spoiler alert for degree show: finished film.
(or almost, there was a glitch or two in this one which has been smoothed out for the handed-in version but nothing drastic enough to warrant the re-uploading time for this blog)
Hooray! Just the making of to go!
Waverley : What Would Sant'Elia Do? from sarah dargie on Vimeo.
Thursday, 9 August 2012
Opening Shot Update
Updated version of the opening shot, bar stabalising the camera and fixing the shader rebuild on the render I've done very little to this as I liked the feeling of it but felt it was too static. By rendering out the frames at an oversize format, I was able to extend the boundaries of the shot and add in a camera movement.
Current version:
Princes Street Update
With this one I have corrected the colour, realigned the frame composition, amended the rotoscope and added in a camera pan. The footage for this shot comes in at over 37 seconds, giving me a lot of scope for choice. I chose the below section (though the actual shot in the film will be less) because I liked the pacing of the arrival of the train. Overall I quite like this shot, more than any of the others it justifies the use of the site and is most like Sant'Elia's original drawing:

Current:
Previous:

Current:
Previous:
Degree Show / Printing
So last week I got everything for the degree show printed including the finished production bible and post/ business cards, although not a requirement its useful and something to do while waiting for renders! Yesterday we began the degree show build and got everything in frames ready for mounting. Exciting times ahead. Excuse the blurriness of some of the photos, was borrowing Garry's phone.


Window and Doorway
Updated versions of the window and doorway shot. I will probably go back and adjust the saturation of the doorway but only when I have it in sequence with the others so that I know how it is going to fit.
Current Versions:
Current Versions:
Older Versions:
Birds-Eye
A big thanks to Garry Whitton who helped me out a lot with the compositing of this yesterday afternoon. This was by far the trickiest shot to create and one of the worst. By providing a fresh pair of eyes Garry was able to help me adjust the colour and shadows and took over for an hour at the end of a long studio day. Its far from perfect but in comparison to what it looked like before its much more effective and with a day to go and six shots left to edit it will be fine. Link and Jenny also helped out with this one and so thanks to them all.
Current Version:
Older Version:
Wednesday, 8 August 2012
Window Shot
Edit time. I really wasn't happy with the way this was before. Really wasn't sure what was wrong with it either until Dylan came round and pointed out that the window was far too dark and rendered me out a new window matte pass so I could get a background image in. So after the addition of a lens blur with depth map attached, a background, some chromatic aberration (aka. the new lets-add-it-everywhere-like-we-used-to-use-lens-flare effect) using shift colour channels, tine and optics compensation in after effects and adjustments to each layers opacity here is the updated version. Not perfect but much better:
Tuesday, 7 August 2012
Sound and Editing
Hooray,
managed to get some sound in based on the leica reel I created early
this morning. There are some glitches but this is just and edit to get
how many frames of each shot I will be rendering. The changes will be:
- I will be changing around the title sequence and adding on Trainstations beneath power station
- I will be increasing the end forework shot by some frames to better fit the music.
So
happy that there is sound, it makes such a big difference. The music I
don't own (but did purchase) but as its only for education and not
commercial or even wide release it will be fine. The track is by Daft
punk off their Tron:Legacy OST for Disney but for now it works fine . I've only had to edit the music a
little and then added some basic
firework noises for the credit. In the future I'd love to add more to it
in terms of shots and sound but for now it will just have to do. Adding
the sound allowed me to cut down the shots in the middle and improve
the pacing, which in comparision to the leica it was edit form is much
snappier. See below for comaprison. Now I just need to severely edit and finish the film (and create a making of)...actually looking forward to it, really enjoy editing things.
Sound test edit:
Original test edit:
Leica 02
Current leica reel shot edit. This allows me to add some sound this morning and then fully edit what I have. Hoping (with all my fingers crossed to have a finished, modified, polished one with sound by 9am Thursday morning, his would allow me to have 1.5 days to export, ensure its working and throw together a making of before Friday afternoon. At present its really not great, really need to pull it together colour, timing and pacing wise and its ben uploaded in awful quality just so I can get it online quickly prior to meeting with Jeanette. At least having this allows me to edit the sound in real time and that will make a huge difference. The bad thing is theres a lot to do, the good thing is I know exactly what I want to change, and if it means the making of doesn't get completed until Saturday then I have a production bible completed and printed in the mean-time so be it.
Revised Title and Credits
Pretty happy with the credits, sure they go fast and the timings a bit off but there's 3.5 days to go and they only took 45 mins so that can go onto wish-list for future things to fix. Win. Also updated Title sequence with revised timing. I'm hoping to simplify it but for now here we go (I need to cut it at the end but this will be done in the final edit when I can throw sound Sound at it):
Credits:
Title:
Monday, 6 August 2012
Title/ Intro Sequence
Finally got the timing on this right. Last week after talking to Dylan and a few of the animators in my class it was decided that my film maybe needed a bit of explanation to the audience what it is they are looking at in my film. After spending longer on it that I wanted to and several revised timing, here is the intro as it stands....
Birds-Eye Nightmare
The way that my film worked out I ended up having to do something which I normally hate doing; to leave the hardest shot until last. Clocking in at around 72 frames this shot seems deceptively manageable, however I would have to say that out of all of them this is the one which has caused the most strife. I got help from both Link and Jenny with this shot and still it was a nightmare. The initial shot was filmed from the to[p of the Walter Scott Monument through some railings on a windy, cold day in May. In order to get the shot at the angle I needed I had to film it by hand without a tripod so even from the beginning i knew there would be issues. Out of five different shots I took I chose this one and briefly experimented with colour correction in NUKE:
I then passed the shot onto Link for him to match-move. From this we got a camera solve for Maya but Link had had a hard time doing it and we both expected that there would be further issues with it:
I ended up resorting to 2D and stitched together some photographs which I then painted to create a clean background plate. Using Jenny's rotoscoping I was able to roto in a sense of the people on top of the background to re-gain some of the movement which was lost. I did attempt to add in some cars but the angle of the shot meant that it looked even messier:

This shot is far from perfect but hopefully if I can add some grain and some glow etc and blur from the sky it will come together in a more polished form.
Friday, 3 August 2012
Friday Review
Although its nearing the end, throughout the course I have continued to watch architecturally based visualisations and have found both some lovely and awful examples out there. Curiously though unsurprisingly it remains that the projects undertaken by those with a CG/ Visual Effects background are infinitely more successful (in my opinion) than those created by companies with a strictly more architectural background, a difference which can be seen in the two examples below...
The Good...
This is a lovely little video about a Jewish memorial by award winning Russian compositer and 3D artist Efim Armand. Its a rather simple beautiful architectural piece created in 3Ds Max and Vray with lovely camera movements and pacing. Someday I would very much like to aspire to this level of 3D mastery or at least get a better understanding of cameras to get some more realistic effects in there. Its rather inspiring although makes going back to work on my own project slightly disheartening...
The Bad and The Ugly
..or it did until my good friend and fellow animator Kieran Baxter brought this gem to my attention. This video is the actual 3D fly-though for the proposed V+A museum in Dundee. I understand that it is supposed to be an online interactive piece which would be fine but promoting it as an architectural visualisation film its a prime example of everything I'm trying not to do and what I think is wrong with architectural visualisations. From the insipid music to the unnecessary camera movements it feels dated and rather nauseating, removed and un-engaging. With exactly a week to go to this very hour I may not have a finished polished piece but at least it feels more creatively inspired than this. Enjoy?
Peep Show
First version of the external shot looking in. Big thanks to Dylan who took the time to render this out for me after two weeks of momentous issues with final gathering and occlusion. I was originally thinking I wouldn't get this shot in the film at all however I'm glad to have it in some form as it shows that although incomplete I have indeed been working on developing the internal space. Even when it was rendered I had issues regarding a disappearing shadow pass and the files insistence of loading in the opposite order.
The final composition comprised of three different render layers: a foreground and background (which contained Depth, Ambient Occlusion, Diffuse, Indirect Lighting, Specular, Reflection and Refraction passes):


and a matte foreground layer for use as an alpha to control the transparency of the glass:

When it came to compositing the shot I've been debating whether to make the glass coloured/ stained or just grimy and slightly transparent. At present I'm leaning against the coloured glass. Coloured:
Not coloured:
And another version including enlarged stills. This is because the shadow pass didn't render out properly, I have used the Ambient Occlusion layer to bump it up but the results on the stone aren't as nice as I had hoped, by enlarging the shot there is less stone to worry about:
Wednesday, 1 August 2012
Deadlines and Thanks
Two shots to go and today I got both the final renders from Dylan for the external/internal shot that was causing major issues on the render farm and beyond so a massive thank you for all his time and help. Also today I got the rotoscope for the tricky birds-eye shot from Jenny Gauci so within the next few days a more final film will be in existence. Potentially. Behind the scenes I have managed to get all the degree show printing and production bible complete so just the film, presentation and making of left. Below is a basic comp showing off Jenny's hard work now Its time to test that the camera solve for the renders I have is more successful than the original opening.
Saturday, 28 July 2012
Leica Reel 01
So as much as I have two weeks and only two shots left (one which is being kindly rotoscoped for me and another which Dylan is having to help me render as its proving to be an issue - 5 hours a frame is not good) and there is two weeks to go I have a lot of work ahead of me. I'm still battling through the production bible and stills (hopefully done by Monday/Tuesday) and on top of that I have to turn all the shots into a cohesive film. I really enjoy the editing process but this is going to be tricky. As step one I've compiled a basic leica without any edits of how the shots stand. Its rather static, disparate and jarring. I've made a list of what I would like to change which will be next weeks task and its going to be a tough one. Good news is that I should be able to add sound!
Fire and Brimstone
I've been in a world of pain trying to create this shot. Initially I was having issues with the shader rebuild in NUKE, I was getting the level of detail I wanted but adjusting the colours I required was proving to be really unbalanced due to the transparency of the glass material. I decided then to export the shader rebuild as a tiff sequence and adjust in after effects simply because I have a better working knowledge of the program. Very quickly I was able to get the colour results I wanted and took it back into NUKE for compositing.


Initial shader rebuild (image toned down as specular and reflectivity were more bleached in the original):

Initial after Effects Colour Correction, I really wanted it to have a warmer, modern, soft pink lighting to it:
The next step was to add the fireworks. Initially I tried to mask out the glass using rotoscoping but it was a slow, unnecessary step and asked Dylan if there was a better way to approach it. There was and I ended up rendering out a new matte pass to use as a multiply mask for the reflections of the fireworks. As this image also contained a straight alpha I was then able to use that to create the mask for the fireworks in the sky.
Composition with the ridiculous amounts of rotoscoping (green nodes):

The matte pass which I rendered out for use as a mask. It was really simple to set up, just created an extra render layer with a material override using two surface shaders. Its a pretty cool effect in itself and very much in the style of the French animated film renaissance. This way gave me an accurate cut out for the glazing:
Sadly all this jumping between After effects and NUKE had created an issue with the alpha on the fireworks and initially I was having problems with NUKE exporting at 24fps despite setting the project values to 25. To overcome this I created a new scene and pasted the nodes in. After rendering out two sections of the fireworks sequence in After Effects I was able to put them together and after a bit of tweaking using the mix functions on the merge nodes I almost have the shot I want. I think overall its a little bit too reminiscent of "Disney" so I may return to the original shader rebuild but essentially the shot is there and its been fun. The end composition in NUKE seems deceptively simple. I do finally feel like I'm really starting to understand how to use NUKE efficiently and I'm really enjoying it, its like a giant puzzle:

Thursday, 26 July 2012
Masked Explosions
I've spent a large portion of this afternoon trying to work out how to use matte images as alpha channels or masks in NUKE. Although I'm not quite there in getting it to do what I want yet but I've also been testing some possibilities for the end credit sequence while titles role and I'm currently thinking of something along these lines:
Final Countdown
So to keep myself on track I've revised my schedule with regards to progress I have made, adjusted work hours and confirmed dates from tutors. With two weeks to go its do-able but will still require a lot of work and more effort than I can conceive. Its very important I leave a lot of time to editing as narrative is a key exploration point in my program of study and at present the shots are rather disparate. I'm also hoping I'll have enough time to add some music or sound to tie it together as I really think it would benefit from it. I've also attached a sketchily updated production chart indicating where I am. With luck the external firework shot will be done tonight leaving me the weekend to tie up loose ends on the shots, fix progress and organize what I need to print etc. for the show. Although nothing is quite perfect or the way I want it yet its getting there.


Troubled Beginnings
This shot took far longer to composite than expected. Despite Link's brilliant efforts with camera tracking I couldn't get a clean enough solve on the original shot I wanted to use. I then tried re-tracking the shot in 2D both After Effects and Nuke. When I applied the tracking data to the renders I still wasn't getting a satisfactory results and after a few hours of trying to manually adjust the renders it was still not working well. I think this was due to the lack of parallax in the original footage but I was still surprised at the lack of a steady result even when using a still frame over a rendered sequence:
After some deliberation I decided to use another version of the opening shot which had a cleaner solve. This involved a lot of re-doing rotoscoping and rendering however the result is much more convincing. There is still a slight wobble when the renders are added to the shot however I am anticipating that when the grain is added and the final edit is put together that this will be less noticeable. So here is the new opening as it stands. Although I am sad to miss the addition of the people it is more fitting to the atmosphere of the piece without them and the colour more in keeping with the subsequent shots:

My only issue now is that it blends in rather too well perhaps with the environment colour-wise, which may make it tricky to spot but is ultimately maybe not a bad thing.
Monday, 23 July 2012
Princes Street
This shot marks the halfway point. Admittedly there are some of the hardest shots left but its starting to get there. While I need to fix the roto around the building top in this version the shot is virtually there. While it doesn't look they way I had anticipated at the outset of the project I'm happy with it given what I know now and the time left. I'm really happy with the way the colour matching between the render and the environment. I had to cheat slightly however, I wanted to add more detail onto the bricks of the station and not having access to the studio meant that I updated an tiff instead of the exr. I think its worked really well and has allowed me to save some time.
Original exr rebuild:

Final Tiff (Note that because I was only using the top of the render I only added detail to the part which was being used) :

Current composition (the roto on the last bus windows is missing simply because as the shot is currently 25 seconds long I will only be using the first 20:
.png)
Sunday, 22 July 2012
Bridge Shot
Going on a mini-adventure to the highlands for 12 hours gave me a lot of time to sit on a train and tweak this shot. It really feels like it is almost there.. Once the composition was fixed I had to re-render different shadow layers, grade the pre-multiplied render, add edge blur to make the roto less jarring, fix the colour deformations which was happening under the bridge, dirtied up the texture to match the soot stained sandstone of the bridge and reposition the render. There is so much more I could and maybe should do to this shot but I am however going to move on from this for now and come back to it at the point of editing as I need to make progress on the others. After nine different NUKE compositions and 20 renders I have been looking at it too close for too long. Coming back to it fresh once some of the other shots have been worked on will help me to see what I need to change. At present I think the building needs to be almost lighter/dustier in places and that the roto on the furthest away person could be smoother. The next shots I'm going to work on are finishing the external night shot and Princes Street with the train and Im determined to get two done by the end of the weekend.

Friday, 20 July 2012
Night Shot Render Test
Test render export from NUKE with my first attempt at colour correction and shader rebuild for the external firework shot. Its currently rendering out much darker than I was expecting so will definitely modify that as well as possibly re-tweaking the bump maps on the textures and tone them down, can't wait to put the fireworks into this shot, should be fun...
Problem Solving
So after yesterday's progress I encountered some problems later on. I was having transparency issues when it came to plugging the render into the full rotoscoped footage. I suspected that it was something to do with the alpha channel being lost during the shader rebuild process but no matter how I tried to re-plug the alpha back in from the original I continued to get a phantom building semi-opaque result, nasty:

In one respect this worked in my favour as it meant that I finally buckled down and modified the roto. The original roto which Felix had kindly done had been partially taken from a video exported at a strange frame rate (I think it has been imported as 30 fps then exported at 25) it was entirely my fault and I knew that I would have to fix it. Initially i tried to find a cheap fix and re-export the footage at a HD version of the wrong timing but could not get it to match so in the end buckled down and re-modified the roto properly:
With this finally fixed I returned to the comp and tried to work out why I was having transparency issues. Again I was able to get some assistance from Dylan and we were able to work out that the issue with the composition was that on the final merge node the footage was being taken in as A instead of B and the roto on the shader rebuild was distorting the alpha of the render . After a little bit of modification I finally got the correct result and can now work on getting the render to look more like it should, hooray. Now that the composition is working more succesfully after I have get the render working I can reuse this composition structure and apply it to Princes Street shot and the opening shot:


Thursday, 19 July 2012
NUKE Development
Initially I had hoped to have had this shot finished sooner however I got stuck on the NUKE composition regarding the rotoscoping and discovered that the rendering process once again required more of my attention than expected. Earlier today I had two quick meetings with Dylan who helped me sort out my composition which turned out to be far more straightforward than I was expecting and I was able to update the composition with a quick png test render while the exr renders. Below is the result of a new NUKE comp, incorporating a basic shader set up (minus the final exrs and shadows) and the roto and colour correction for the final. Good news is that once a basic comp. set up is achieved it can be employed on the other scenes too.
Hopefully now all I need to do now is import the final exr and tweak the overall colour:

Tutorial Form and Schedule Updates
Prior to meeting with Jeanette later I've created another tutorial form and updated my schedule.


Closing_Shot_01
So the resolutions a bit nasty and I'm having issues with a phantom crane but first attempt at the closing shot below :

Wednesday, 18 July 2012
Doorway
This is a quick shot I threw together and in all honesty probably works better as a still image though I do like the 1930s soft filter feel. The rain will be modified with a glow and the timing of this shot will no doubt be changed. This is not a full shot, more of a filler with the idea that I rather like the textures around the doorway and I needed another quick shot to balance out the static slightly CG-ness of shot 4 and make the overall leica reel feel more balanced as a whole. I won't be coming back to this one until the editing process as its a very low priority though it needs a bit of work but take 01 is below:

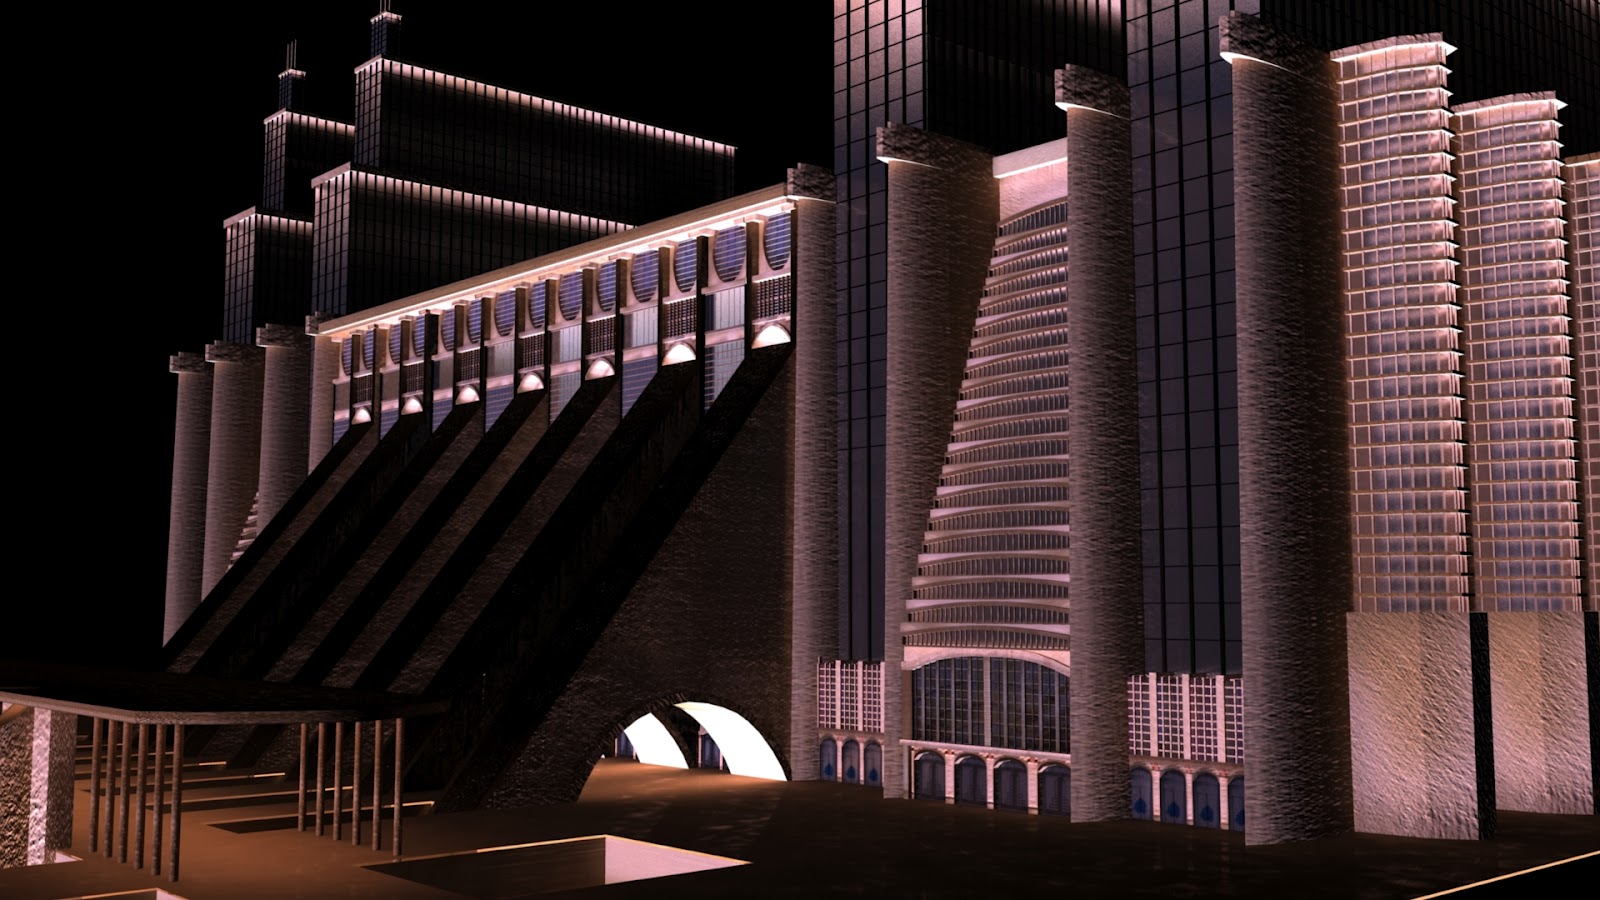
Tuesday, 17 July 2012
Post #200 - Night-Lighting Tests
These are the first few test renders for the night shot with fireworks. Obviously on the first one I forgot to turn off teh IBL (oops) and the textures need to be tweaked for it (tone down the bump maps) and I'll probably add more variation with the colour of light but I'm really happy with the first attempt, especially with the under light of the arches and the top of the towers.

Still Image : roof
Rooftop shot, this ones always been a bit tricky but if nothing else will work as a storyboard panel development.

Monday, 16 July 2012
Opening Rotoscope
Rotoscope for the opening shot. Again will require some tweaking when the building is placed into the shot but hopefully not too much.


Saturday, 14 July 2012
Still Image : Princes Street At Dusk
This was a still taken from the old version of shot 078 which I could never get to work properly as a moving image. Again I still think it needs fixing but I've always been really happy at the way that the lights have come out for the background, and it was fun to do.

Still Image: Alleyway
I've never been happy with this image. I know there is something wrong with the glass but there's something else which doesn't seem right. Thing is it works really well as a thumbnail so fire away with any advice on improvement.

Subscribe to:
Posts (Atom)